Showing posts with label Tips and tricks. Show all posts

You’re probably reading this article if you were going to find the calculator on your Windows XP machine to figure out some important calculation. After a bit of searching, you probably realized that your calculator is missing!

Pretty weird right? Well this can happen for a number of reasons, but basically your calculator is gone! If you recently installed a service pack to XP, such as SP2 or SP3, that could be the culprit.

Either way, here are a couple of ways you can get your calculator back in Windows XP!

Method 1 – Reinstall Calculator

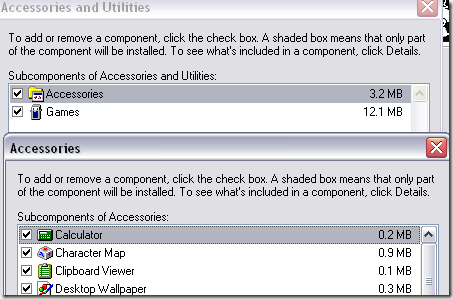
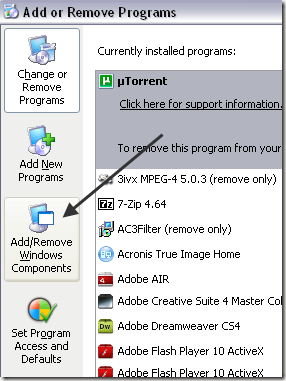
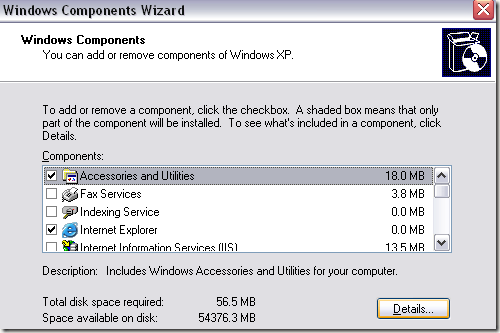
The first method is pretty straight-forward as long as you have your Windows CD. Pop it into the disk drive and go to the Control Panel. Now go to Add/Remove Programs, click on Add/Remove Windows Components.

calculator is missing

Click on Accessories and Utilities and then click the Details button below:

windows xp calculator missing

Now click on Accessories and click the Details button again. Now make sure to check the Calculator box.

calculator disappeared

Now click OK all the way back and XP will go ahead and reinstall the calculator! If you can’t get a hold of a Windows XP disc, then try the second method.

Method 2 – Copy over calc.exe

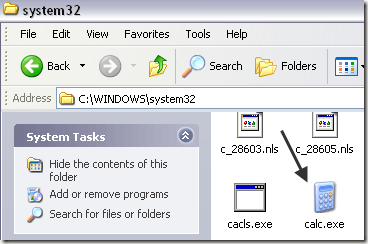
The second way to do it and maybe the easier method is to simply copy the calc.exe file over from another machine to your C:\Windows\System32 folder. Also, copy calc.chm to c:\Windows\Help.

calc exe

Obviously, you’ll find both of these files in those two directories on another computer that has the calculator working. After that, you can just create a shortcut to the calc.exe file on your Start Menu or wherever you like.

If you have a Windows XP cd, you can also try popping the CD in and running these two commands, where X is your CD/DVD drive letter.

expand -r X:\I386\calc.ex_ c:\windows\system32
expand -r X:\I386\calc.ch_ c:\windows\help

If your calculator is still missing or gone, then post a comment here and I’ll try to help!

Posted By George September 26, 2009 0 comments

People save web pages to ensure they can retrieve information later without having to load it on the internet. It also is a way of retrieving a web page just in case the original web site has an outage or goes offline for whatever reason.

There are two basic ways of saving web pages, that being via the browser or "printing it" to a PDF.

Via the browser

The browser that has the absolute best web page save feature is Internet Explorer 8, due to the fact it can save entire web pages as a "Web Archive." When you click File/Save As (if you don’t see that in your IE 8, press ALT on your keyboard to bring up that menu,) you’ll see it as a save option:

image

When you choose to save it will "crunch" everything into a single file:

image

Why is this the best? Because it’s a single file that contains everything (and that’s why it’s labeled as an archive.) All the text, all the images and everything included. If you load it afterward, it looks exactly the way it was originally. It is to the best of my knowledge the only browser that does it right.

Other browsers, such as Firefox, save as "Web page, complete" and it’s nothing but a huge mess. An HTML file will be saved which is the web page, but a subfolder will also be created with all the images, JavaScript files, etc. You can literally get 20+ files out of a single web page save.

Love or hate IE 8, it rules the roost when it comes to web page archiving.

Drawbacks:

  • Only one – it’s proprietary to IE 8. Otherwise it’s the best way to archive a web page.

Via PDF Creator

If you don’t use IE 8 and want a web to save web pages a single files that include images and so on, the best way to do this is to use PDF Creator to create PDF files. This is free software that will install a virtual print driver and can be used in your web browser of choice.

Once installed, go to any web page, load it, then click File/Print or press CTRL+P.

Choose PDF Creator from the window that appears:

image

..click OK.

The page will be crunched and made ready for PDF rendering:

image

You’ll see this:

image

Click the Save button at bottom right. You’ll be asked to name the file and where you want to save it to. Once done, the page is archived as a PDF.

Drawbacks:

  • Many times the PDF creator will default to a serif font (Times New Roman) instead of the font seen on the original web page.
  • Any links in the web page will not work in the PDF.

These drawbacks are usually acceptable being it’s the text you care about the most when it comes to a web page. Any images on the page will be embedded in the PDF; all text is searchable as well.

In addition, the PDF created even for very large web pages will be small in file size, suitable for sending in email if you want to send it off to a friend.

Via ScreenGrab

This is for Firefox only.

ScreenGrab is a FireFox plugin. It allows you to save a PNG or JPEG screen shot of any web page, but does so far better than ALT+PrintScreen. ScreenGrab will take an image of the entire page including the full length. The screen shot taken will look identical to what you see on-screen.

Drawbacks:

  • Since the output file is an image, none of the text can be searched and links won’t work either.
  • The default output file is a PNG. If the web page you save is very long, the file saved will be enormous.
  • On very large web pages it can cause Firefox to freeze up when attempting to take a full screen shot, particularly on slower computers.

You can make the screen shot ScreenGrab takes to be smaller by purposely not using the browser maximized, because yes, ScreenGrab captures everything – including all the white space on the sides.

To use ScreenGrab, install the add-on, then on any web page, right-click and choose ScreenGrab:

image

"Complete Page/Frame" will save the entire page, length and all.

"Visible portion" only captures what the browser is displaying at that moment.

"Selection" allows you to select what you want captured.

"Window" acts like ALT+PrintScreen does.

Choosing to Save will save the file. Choosing to Copy will copy the image to the clipboard buffer where you can paste into another program such as an image editor, Word, etc.

Posted By George 0 comments

This guide is for anybody that has a whole bunch of files, be they photos, MP3s, documents or any other type of file you have that needs quick-sorting by date at a glance.

There is only one right way to put the date in a file name. When I say "date in a file name" I mean that the actual title of the file has the date in it.

The format you must use for proper date formatting every time is:

  1. Four-digit year
  2. Dash
  3. Two digit month or single digit month with leading zero
  4. Dash
  5. Two digit day of month or single digit day of month with leading zero
  6. Underscore
  7. Description of file in lowercase letters with words separated by underscores (optional, but more compliant)

Here’s an example:

2009-03-27_my_document.doc

Now I’m going to explain why this is the proper date formatting structure for file names.

Four-digit year

You do this so as not to confuse a year with a month. If you have a date written as 08-07-08, is that August 7, 2008 or 8 July, 2008? You can’t tell.

"That doesn’t matter, I always use month/day/year."

It does matter because not everybody uses month/day/year.

Two digit month or single digit month with leading zero

A two digit month is each enough to understand. For example, December is 12.

A single digit month, like May, is 5. But you don’t write it like that. You add in a leading zero so it’s written as 05.

Why?

Because some operating systems will not list files in proper numeric order without the leading zero. Windows XP and all previous versions prior to it do this.

Example: You have 10 DOC files from 0 to 10. The single digits have no leading zeroes on them.

This will show in XP in Windows Explorer as:

0.doc
1.doc
10.doc
2.doc
3.doc
4.doc
5.doc
6.doc
7.doc
8.doc
9.doc

Note the 1 and the 10 are right on top of each other. Why does XP do this? Because 1 comes after 0, before 2 and all other numbers. XP is only going by the first character it "sees."

Even Windows Vista and 7 still do this when listing files outside the Windows Explorer interface (such as a File/Open dialog box.)

Second example: 00, 01, 02, 03, 04, 05, 06, 07, 08, 09, 10

All these numbers will be listed in proper order. 0 always comes before 1, and even with the way Windows lists files, it absolutely will not get this "wrong"; that’s why you do it.

Two digit day of month or single digit day of month with leading zero

You do this for the exact same reason as for the month.

Underscore

The underscore (this character: _) is necessary because the dates uses dashes already. Using underscores gives a clean visual cue as to what’s a descriptor and what’s a date.

In addition, you use underscores because trying to send a file over the internet with a literal space in it results in a %20, or just fails on attempt to transfer. A replacement must be used for the space to avoid this. Underscore is it.

Description of file in lowercase letters with words separated by underscores

As said above, this is optional. You use lowercase just in case you ever have to upload this from a command line via FTP. Where case of letters is involved, mistakes can be made easily – especially if it’s a long file title. If you know all the letters are lowercase, this decreases typing mistakes significantly.

Why Year/Month/Day and not Year/Day/Month?

Year/Month/Day is proper big endian formatting and follows ISO 8601 international standard. Year/Day/Month does not. You can see more info here on that if you like.

Okay, so I know a bunch of stuff about date formatting in files now. Why should I care?

You should care for three good reasons.

First and most obvious, it will make your files easier to manage no matter what OS you use. And if you plan on sticking with XP for a while longer, this is mandatory because of the way it lists files starting with digits.

Second, being that the world is getting smaller every day, chances are you’ll be trading files with someone across the pond sooner or later, if not doing so already. Using the internationally recognized big endian standard eliminates any and all confusion as to what a date format truly represents.

Third, in addition to files being sorted properly no matter the OS you use, they will also sort properly no matter what web site you use. Using Windows SkyDrive, Google Docs, plain FTP or other means of online storage? You’ll be able to sort a whole lot easier using proper date formatting in the titles of your files.

Wouldn’t it be easier just to sort by date modified or date created?

Not necessarily because it can add in many repetitive steps.

In Windows (XP/Vista/7,) two columns that can be added via Windows Explorer are Date Modified and Date Created. However in order to see these, you have to be in Details view mode when looking at files.

Date Modified is usually there by default, but Date Created isn’t, so you have to add that in by right-clicking a column to see all that are available, then choose Date Created so it can be seen.

Example from Windows XP:

image

To get to this point, it took five clicks just to see this stuff.

  1. View
  2. Details
  3. Right-click column
  4. Date Created
  5. Click to sort by date created

You may have to do this over and over again – particularly in XP – because this view mode may not be "remembered" by Windows. It can get very frustrating quickly.

Adding in the date to the title of the file eliminates the need to do any of this.

Where would using date formatting like this in file titles be most useful?

Three instances comes to mind:

  1. Photos
  2. Documents
  3. Dated audio or video broadcasts

Is there ANY WAY to automate the process of renaming multiple files with the date like this?

Absolutely. The tool you need is Rename Master for Windows. Here’s how to use that software to modify as many files as you want – all at once – with their creation date at the front:

1. Launch Rename Master.

2. Remove all existing steps. This is done easily by clicking Edit then Clear Renaming Options, like this:

image

3. In RM, navigate to the folder where the files are. Do this by using the Folder Browser on the left of the application. If you don’t see it, press CTRL+B while using Rename Master.

4. Click the New Step button, then Add to Beginning/Ending, like this:

image

5. Add the following in: ?dc:FYYYY-MM-DD?_

Yes, I know that looks weird, but it works. It looks like this:

image

Make sure to select "at the Beginning" and "to the Name" as shown above.

6. Click the New Step button again and choose to Replace Name/Phrase, like this:

image

7. Set the step to look like this, and follow the steps carefully:

image

Next to "Replace the" we select phrase. This will enable the other fields.

In the field directly to the right of phrase, click inside and press the spacebar once to add in a space. You cannot see this in the screen shot above because a space obviously cannot be seen.

In the field directly to the right of with, type in an underscore (this character: _).

8. Click the Case & Wildcards tab, check Override configuration settings and tick the option for lowercase, like this:

image

9. Compare the Name to the New Name column to make sure the appropriate changes will be made.

image

Above is exactly what we want. The best example is "New OpenDocument Text.odt."

As you can see from the New Name column, it will be changed to:

2009-09-23_new_opendocument_text.odt

The file creation date is added using the proper date formatting. All spaces are replaced with underscores and letters that were capitalized are changed to lowercase.

After that it’s a click of this button:

image

(Located at the bottom of Rename Master)

..and that’s all there is to it.

Always remember to proceed carefully with the renaming of files, especially for large amounts of them. Pay close attention to the New Name column in Rename Master when using the software, because whatever you see there is exactly what the files will be renamed to verbatim. So if it looks wrong, it is wrong. Correct it before hitting that rename button at the bottom.

Final notes for Vista/7 users

As you know, file permissions are needed in order to rename files in specific places. RM may not function correctly if you try to modify files it doesn’t have proper access to. To overcome this, rename files that you have located either in a specific folder you create on the desktop or a specific folder you create in My Documents. RM should work without issue when renaming files from those locations. Just remember to create a specific folder to do it so you don’t rename anything else by mistake.
Posted By George 0 comments

After reading the title, you may think to yourself, “Only ten? There are hundreds, perhaps thousands, of free programs for Windows.” This thought would be difficult to disprove as there are vast numbers of freeware programs available for the Windows operating system. This is simply short list of ten programs that will prove helpful when working with the Windows platform.

1. Firewall: Sunbelt Personal Firewall. This program can be found at Sunbelt’s website. It is easy to setup and does not consume too many system resources. A good firewall is an essential piece of security all computers need, and this one fits the bill for Windows. Additionally, when it asks you for permission to allow or deny a connection to something, it will remember your choice. There are other firewalls that suffer from memory problems when you instruct them to block a service, only to forget and ask you again at a later date.

2. Anti-malware: Microsoft Security Essentials. Even though it is not officially released as yet, Microsoft Security Essentials (code name: Morro) does quite well even as a beta product. Though the downloads have been cut off at the Microsoft Connect website, it can still be found at softpedia.com’s website. While some people may be apprehensive about using a Microsoft branded security product, Security Essentials has come a long way from the initial offering of Windows Defender from years past.

3. System Cleaning: CCleaner. A Windows computer builds up temporary and useless files daily with normal use. Surf the Internet, get temporary Internet files. Install and uninstall programs, your computer has leftover files that did not get removed. There are also other programs like Windows Update and Microsoft Office, which produce unneeded files periodically. CCleaner runs through Windows, and flags the excess files for removal. The user is able to select what that want to remove, or keep, and let CCleaner do the rest.

4. Search Tools: Google Desktop. Your three year old computer may not be as uncluttered as it used to be. Thousands of digital pictures, emails and other files later, it can be daunting to find things. Luckily, Google Desktop is there to help locate what you are seeking. Putting the power of the Google Search engine on your computer, and after it finished its initial indexing routine, finding files is much faster than clicking through folder after folder, or using Windows Search.

5. Image Editing: Paint.NET. When you need something better than MS Paint, balk at the price tag of Adobe products, and are overwhelmed by programs like the GNU Image Manipulation Program (GIMP), there is a third option. Paint.NET is light on system resources, but plenty of options for good image editing. The authors also have a message board and tutorials on their website for those who want to get further information on their software.

6. File Compression: TugZip. With the ability to compress to and extract from a sizeable list of compression formats, TugZip is a freeware must have for anyone needing a program for making ZIP type files. TugZip adds a list of formats to the Windows right-click menu, making the compression of a file or folder a simple two step operation. Additionally, TugZip gives the user the ability to create encrypted archives so they can safely store there computer files, without too much complexity.

7. Instant Messaging: Trillian. Having been available since 2001, and going through many updates, Trillian has place itself as an excellent tool for replacing brand specific instant messengers. By combining services like MSN Messenger, AOL Instant Messenger, and Yahoo Messenger, Trillian eliminated the need to run separate IM programs. It also covers the social networks of Twitter and Facebook, for posting; as well as the ability to tie into Skype.

8. Download Tool: Download Accelerator Plus. Though this software is Ad Supported, it is free. Accelerator Plus can greatly boost your file download times by attempting to get the data from multiple sources on the Internet. This program also has the ability to resume downloads if your connection experiences interruption, or the originating file location has issues.

9. Disc Burning: Ashampoo Burning Studio Free. When it comes to burning CDs and DVDs, the easier the program, the better. With a friendly graphical user interface, and a step through process for burning disc media, Ashampoo Burning Studio Free answers the call of the need for disc creation software at a practical price (free). This program can also create ISO files for those of us who need operating system discs; as well as other specialized disc formats.

10. File Restoration: Recuva. Made by the same group as CCleaner, Recuva helps people get back lost files. Whether you emptied the Recycle Bin, or pressed the Shift+Delete key combination with files highlighted, Recuva scans your hard drive(s) and looks to see what is still recoverable, and what is not. It does an excellent job of file recovery considering the price tag, free.

Posted By George September 23, 2009 0 comments

Have you ever had an image in a standard format (PNG, JPG, etc.) which you wanted to convert to an icon? If so, the freeware program, SimplyIcon is for you.

Simply create windows icon files (.ICO format) by drag-and-drop images on to this program. [...] This program generates down-sampled 32×32, 24×24 and 16×16 levels automatically. It will also generate the 128×128 level if your source image is equal to or larger than 128×128.

The program is ridiculously easy to use (here is a good at-a-glance review) and sure beats creating them by importing into a graphics program and converting the format. I have used this program several times to make icons (using the company logo) for programs I have developed at work and it works beautifully.

Posted By George 0 comments

Optical media for computers is a form of technology that everybody uses at the present time, be it for storing data, playing games and so on.

Data on optical media can be a pain to work with at times, especially if the disc starts to wear down with age, or gets accidentally pitted or scratched. That being said, here are 5 utilities you should have.

1. nrg2iso

Site: http://www.roland-illig.de/lang.delphi.nrg2iso.html (there is an English version on that page, just scroll down)

NRG is Nero’s version of an ISO. Although the vast majority of optical disc images are ISO these days, you may run into an NRG periodically. Some disc image mounting/burning utilities will “understand” NRG but most don’t. In that case you need convert it to an ISO. nrg2iso does this easily and quickly. Works in nearly all versions of Windows, including Windows 7. Once you convert the NRG to an ISO you can easily burn it to a disc.

2. bin2iso

Site: http://www.weethet.nl/english/download.php (scroll down and the download link is there)

This is another disc image format you may run into that you can’t burn or mount – especially if the CUE file is missing from it. Bin2iso will take care of this in short order (even without the CUE file) and convert the BIN to an ISO file. This software is really old and 32-bit only, but it does work.

3. Daemon Tools / Virtual CloneDrive

Site (Daemon Tools): http://www.daemon-tools.cc/eng/home
Site (Virtual CloneDrive): http://www.slysoft.com/en/virtual-clonedrive.html

When working with ISO disc images that you want data access to without burning them to disc, you mount them virtually as a drive letter.

If using Windows XP, the best tool for this is Daemon Tools. If using Vista or Windows 7, the best tool is Virtual CloneDrive.

Both are easy to use. With Daemon Tools you right-click its taskbar icon to mount ISOs as a drive letter. With Virtual CloneDrive you can right-click an ISO and mount, or simply double-click and ISO to do the same thing.

4. ImgBurn

Site: http://www.imgburn.com/

ImgBurn works on any Windows (from 95 all the way to 7) including all 64-bit editions! It also works under Linux in WINE easily as well. When you want to burn a disc image, you need not look any further than this. It always works, never fails, is light and additionally will build images as well.

5. Nero 9

Site: http://www.nero.com/enu/nero9-introduction.html

This is a paid title but worth it if you’re desperate to retrieve data off a damaged disc.

Let’s say you have a disc but it is very scratched and pitted. The disc on insert does spin up but on any attempt to read the data, it won’t work. You’ve tried over and over again copy the data off the disc but your optical drive absolutely won’t do it. You know your optical drive is fine, but the disc isn’t “playing nice” with you.

Nero Burning ROM (included with Nero 9) may be able to help.

What most optical software utilities do is try a set number of times to retrieve data off a disc at the fastest speed possible. After a few attempts it will give up, citing the disc as unreadable. Nero Burning ROM on the other hand will slow down the disc reading speed – even to below 1x if it has to – and copy any bits of data it can retrieve even if it can’t finish a full copy. During the process you will see Nero spit out a bunch of read errors, but that’s okay because it will keep going until it finds the next readable part of the disc, copy and continue as best it can.

For example, if there’s a document file on a disc that has a section of the data that’s completely corrupted from physical damage, Nero Burning ROM will copy it anyway. We’ll say the document is 50 pages long. The copy Nero creates may have corrupted data between pages 18 and 25, but at least you got something. And that’s better than nothing. That alone makes the software worth its price.

Nero 9 carries a hefty price tag of $70, and while the suite of apps you get is large, it’s the Burning ROM program that saves the day because it can mean the difference between getting data back or having it lost forever.

Posted By George September 21, 2009 0 comments

Do you follow a website too closely enough that you want to be alerted when new posts come up or something changes? For people who monitor a lot of hosts with website activity, a tool for doing this is a necessity.

Some website owners may also want a way to see what’s being posted on their own site by visitors or contributors.

image

ChangeDetection.com offers a free service where you can submit a URL that you want to be monitored. Just go to their website, signup for free, then begin submitting URLs. It has a simple interface for entering URLs and monitoring changes:

image

You may want to get alerted only when a sizable change has occurred (i.e. you will not be alerted about a date change or something minor) or only if text has been added or removed.

This can be useful, for example, when you are monitoring a page that lists things (blogs,classified ads, etc) and you don’t want to be notified when something in that page disappears.

You may set the alert to send once per day, week or month. After you clicked the Create button, the alert will be activated and the service will start listening for changes.

image

The ability to see the previous version from the current is also very informative with the new text changes highlighted in yellow and the old removed texts lined-out. It’s a great tool to see the slight enhancements website make to the copy over time:

image

There are other services offered by the site, like comparing two URLs for differences – think of it as diff for HTML content. Another feature allows you to add a change detection panel to your own website so you can have your visitors be notified of changes.

Webmasters and casual users will benefit from this site’s free service. If you own a site that doesn’t have RSS or any other way to notify your visitors of changes, change detection.com is a good option.

Posted By George September 20, 2009 1 comments

I’ve previously written in-depth articles on how to reduce the size of an image file, but have never written about PDF documents. PDF files with lots of graphics and images can become very large very quickly.

In this post, I will try to show you a couple of methods to reduce the size of a PDF file. Depending on whether or not you have Adobe Acrobat (the full version), you can try one method.

Method 1 – Print file using Adobe Print driver

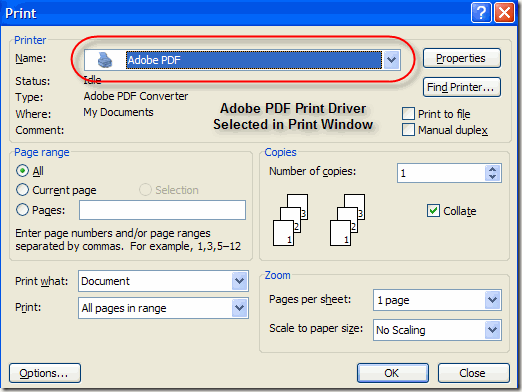
The easiest way to try and shrink a PDF file is to perform a little trick, which basically is printing the PDF document to a PDF file. Sounds strange? It is. Basically, you open the PDF file in Adobe Reader and print it to the Adobe PDF printer.

A lot of time this works really well and will significantly reduce the size of your PDF file. When you go to File – Print, choose Adobe PDF from the drop down list of printers:

shrink pdf Image Source: Adobe Blogs

Amazingly enough, I’ve been able to shrink a 20 MB PDF file down to 3 MB just by using this method. Not really sure what it does to shrink it, but it works, especially if you have a good number of images that are eating up a lot of space.

Method 2 – Use Adobe Acrobat PDF Optimizer

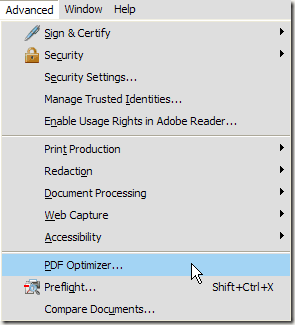
Since version 7 of of Adobe Acrobat, there is a new option in the Advanced menu called PDF Optimizer.

adobe PDF optimizer

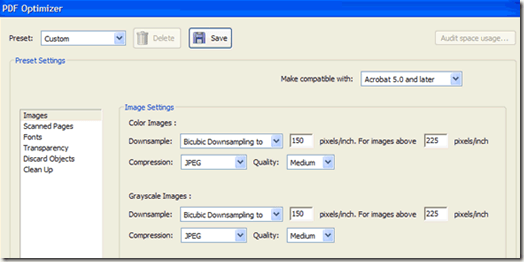
Now you’ll be brought to a screen that has a whole bunch of options to configure!

optimize pdf file size

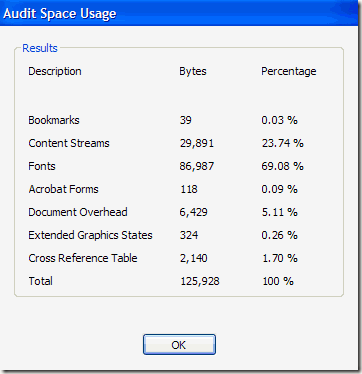
Click on the Audit space usage button in the top right to get a detailed listed of each component of the PDF file and exactly how much space it is using:

audit space usage adobe

As you can see, there are six different things you can do to make a PDF file smaller including optimizing or down-scaling images, reconfiguring scanned pages, adjusting fonts, adjusting transparency, discarding objects, and cleaning up the PDF file.

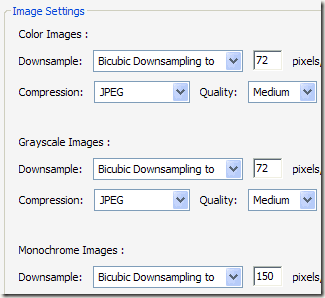
Under Images, for example, you can downsample and compress the images to save space. This is really useful, especially if your images are at a really high resolution that is not needed. For view on the screen, you only need 72 pixels.

reduce image size pdf

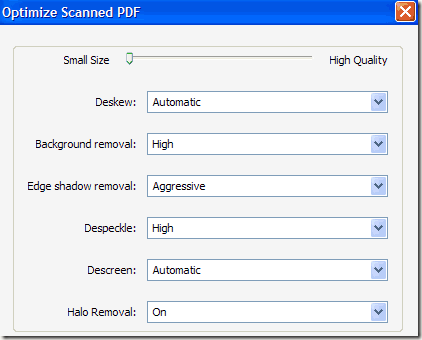
If you scanned a bunch of pages into your PDF, then click on the Scanned Pages option and mess around with the sliding bar, which goes from Small Size to High Quality. Adjust as needed.

optimize scanned pages

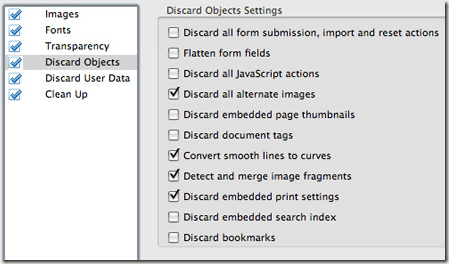
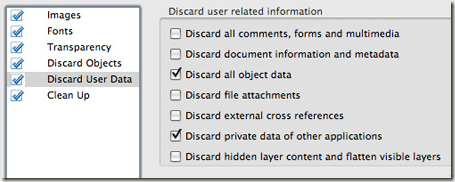
The Discard Objects and Discard User Data are two really useful cleanup options for PDF files. You can basically get rid of all the extra junk that is normally stored in every PDF file. You can remove tags, flatten form fields, etc.

discard objects pdf optimizer

discard user data pdf

For Discard User Data, you can get rid of comments, document information, metadata, object data, file attachments, data from other applications, and more.

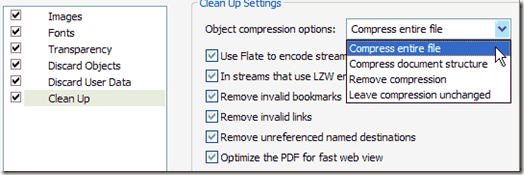
Finally, the Clean Up tab does a few more housekeeping tasks like compressing the entire file and optimizing the PDF for fast web view.

clean up pdf file

The best thing to do is to play around with all the settings to see what works best for your particular PDF file.

Posted By George September 19, 2009 0 comments

USB flash drives are great because they are really cheap and you can conveniently move data between computers. The only problem is when you store sensitive data on a USB drive and it gets lost or stolen!

Most people are intimidated by the words “encryption” because it involves fancy algorithms and names like “WPA, EFS, SHA1, etc”. However, there’s a very easy way to encrypt a USB drive in Windows.

If you want to encrypt files on your computer, read my previous post on how to encrypt your hard drive using BitLocker. If you have lots of sensitive data on a laptop, you should read those articles on how to encrypt your computer data.

Ok, so getting back to USB drives! We will use Windows Encrypting File System to create an encrypted folder on a thumb drive that only one user account on one computer can read. Later we’ll talk about how you can view those files on another computer, but for now we’ll focus on just having a secure USB drive.

Step 1 – Format USB drive in NTFS format

Firstly, you have to make sure the USB drive is formatted in NTFS format. Most USB drives are formatted in FAT16 or FAT32 format, which does not support encryption at all.

Luckily, I have already written a post on how to format a USB drive in NTFS format, which walks you through the process step by step.

format usb ntfs

Step 3 – Create an Encrypted Folder

Ok, now that your USB drive is in NTFS format and all the data has been erased, we can setup a folder that will contain all the encrypted data.

What I like about this method is that you can store all the sensitive files in the encrypted folder, but store other files normally outside the folder. That way, you can still pop the USB drive into someone else’s computer and they can view all the files not in the encrypted folder.

Go to My Computer, open the flash drive, right-click and choose New Folder. Name the folder anything you want, but try not to make it obvious that it has sensitive data otherwise people might be more inclined to try and get in.

Now right-click on the new folder and choose Properties. Click on the Advanced button in the Attributes section.

encrypt usb drive

Now check the Encrypt contents to secure data box. Click OK and click OK again to close out the dialogs.

encrypt content usb drive

Now you’ll see the folder is in green, which means the data is encrypted. That’s it! Now you have a folder on your USB drive that is fully encrypted and viewable only by your user account on that one computer.

Next week, I’ll talk about how you can export the EFS certificate from one computer to another, so that you can view the files on more than one PC.

Posted By George 0 comments

Some people do not like using Windows Update, the default way patches and security updates are delivered to your Windows Machine, due to, among other reasons, privacy concerns with Windows Genuine Advantage. Regardless, if you choose not to use Windows Update you should still keep your Windows installation current with security releases. A site which can help you do this is The Software Patch.

The Software Patch is not just a place to easily find the latest Windows patches, but many other popular programs as well, such as Firefox, Flash Player, Java and iTunes. The usage of the site is pretty easy as you can browse by category or search for the software package you are looking for.

Overall, this site is a good way to keep tabs on the latest releases for many programs which you may be using.

Posted By George 0 comments

Everybody at one point or another has experienced painful boredom when playing a video game, to where you ask yourself, "Okay, so why am I doing this?" This can happen even with the best of game titles and it can be tough sometimes to even enjoy yourself.

The term "button mashing" is when you’re playing a game that you’re absolutely bored with, playing just for the sake of doing so in a mindless way. This in my opinion kills brain cells because if you’re going to play, you might as well enjoy it, because that is the whole point, after all.

Here are my tips on how to avoid the button masher blues.

1. Don’t solely concentrate on one style of game.

One who plays nothing but one style (such as RPG, FPS, etc.) will experience an "everything is the same" scenario. This is in fact true because you’re never changing things around. Purposely try different styles so that you’re not always playing the same thing.

2. Buy an old console.

Head to your local flea market and pick up an old 8-bit or 16-bit system. There are tons of titles and you could try 3 new games every week if you wanted to for a little as 10 bucks for all three. Don’t worry about manuals because they’re all available online. Suggested systems are Super Nintendo, Sega Genesis, Playstation One and so on.

Considering the fact that new games are so frickin’ expensive, it’s nice to have something dirt cheap that just works.

Buying the actual console and getting the games at a flea market is far, far cheaper than purchasing "virtually", such as Virtual Console games on the Nintendo Wii. Furthermore the gaming experience is at its best with the original equipment (emulating on a PC just isn’t the same.)

If you don’t have a flea market near you, check out craigslist or eBay and specifically look for game purchases in bulk. You may be able to pick up 25 games for a dollar each! Search for "nintendo lot", "playstation lot", "sega lot" and so on to see the bulk offerings available on eBay or CL.

3. Play dopey Facebook games.

Many "apps" in Facebook are games such as FarmVille. These games are easy, fun and do not require a lot of effort to play. Anybody can play them in fact. And they’re free which is even better.

Games in Facebook can be found by clicking the "Applications" button, then "Browse More Applications" then choosing the "Games" category.

4. Play dopey Flash games.

One of the best sites I’ve found for this is Gamedesign. One game in particular that is very addictive is Dice Wars. It’s so popular that there’s a multiplayer version of it, KDice. Heck, it’s even an iPhone app!

5. MUDs

It takes a special kind of computer geek to appreciate these. MUDs (Multi User Dungeons) have been around for a very long time. Some of them have been on the internet for more than 12 years. They have everything your standard RPG has, but in text form. MUDs are very addicting and have a very dedicated fan base. Additionally, compared to other types of gaming environment, MUD users are friendly folk that are happy to help out new users who haven’t used MUDs before.

It used to be required that a MUD client was necessary to play them, but that’s no longer the case. Many popular MUDs can be played directly in-browser.

Posted By George September 17, 2009 0 comments

In the past, I’ve talked a lot about backups! Backup software for servers, backing up you PC, backing up the registry, etc, etc. It’s never a bad thing to have your data backed up ten different ways.

Personally, I have local backups, remote backups, backups of just my files, backups of my entire system, and backups of my physical hardware! The amount we rely on computer these days necessitates this kind of paranoia.

And it’s always great if you can create PC backups using free software! Easeus To-do Backup 1.0 is a free software backup utility that lets you backup and restore entire hard disk or partitions.

backup restore clone pc

The interface is clean and very intuitive, making it easy for anyone to use. Here are some of the good features of Todo Backup:

  • Backup system data, partition, or entire disk to an image and restore it quickly.
  • Clone a disk (copy all data from one disk to another)
  • Mount and browse backup images files as virtual drives
  • Check image files to make sure they are not corrupted
  • Copy using either file-by-file or sector-by-sector copying
  • Ability to backup the data straight to CD or DVD thereby saving time
  • Excellent help file with lots of information and explanations
  • Ability to compress and password protect image files
  • Supports FAT12, FAT16, FAT32, and NTFS file formats
  • Supports IDE, SCSI, USB, SATA, and Firewire hard drive interfaces

There are a few scenarios where this type of program really comes in handy. Let’s say you have a computer with one hard drive which is 30 GB in size. Now let’s say you’re close to filling it up and you would like to upgrade to a much bigger hard drive without having to reinstall everything and copying data manually.

Well, with Easeus Todo Backup, you can simply clone the drive and restore it to the new hard drive. That’s it! Set the partition on the new hard drive to Active and you’re up and running on a brand new hard drive.

Also, if you ever download a virus or your system becomes unstable due to software issues or hard drive failure, you can quickly restore the backup to get back to the pre-crash state.

free backup and restore software

Restoring is a piece of cake as it lets you create the bootable recovery media in the software itself. Also, it has several bootable options, so if one boot method fails, you can restore using another method.

Overall, the software is excellent because of the number of features it has and it’s ease of use. I used to use Acronis True Image for backing up my computer, but this software has all the same options and it’s free. Enjoy!

Posted By George September 16, 2009 0 comments

If you use a Windows Live email address, that being any address that ends in @hotmail.com, @msn.com or @live.com, you can access the account right now in the Windows Live Mail client.

The immediate advantages of using WL Mail:

  • No ads anywhere in the client
  • No ads sent on outgoing mail
  • Allows for local caching of mail for faster access and being able to read your mail offline
  • Easier to attach files
  • Faster than using the web interface

There are more but those are the biggies.

The way a Hotmail account is configured in WL Mail by default is to download a copy of every mail in your account (and no that does not mean once downloaded it deletes from the web version.) This unfortunately includes the Junk and Deleted folders, so every time your perform a mail check, anything in those folders is downloaded as well.

You can easily configure Hotmail to download only the headers by simply right-clicking on the folder and choosing the appropriate option.

It’s as simple as this:

image

Pictured above is done by doing the following:

  1. Right-click the Junk e-mail folder.
  2. Hover over Synchronization settings.
  3. Click Headers only.

What this will do is download just the header and not the actual message. You will see the subject line but the mail will not be downloaded unless you actually open it.

I suggest doing this for both the Junk and the Deleted Items folder, because when you delete something you obviously don’t want it locally cached. Don’t worry, your deleted mail will still be there on a server level for 30 days unless you specifically choose to empty the Deleted Items folder.

Any folder in your Windows Live mail account can be set to Headers Only. This may prove to be an advantage for those that have bandwidth caps imposed by their ISP, or a slow internet connection. Headers are nothing but very small files and download almost instantly.

The WL mail client has no ads anywhere in it. Using it in combination with the headers only option makes it one of the speediest mail systems you can use.

Quick questions answered

Does the Windows Live Mail client use IMAP for Windows Live accounts?

No. Windows Live mail uses a proprietary protocol by Microsoft called DeltaSync. It allows for two-way synchronization of mail/contacts/calendar/notes, so it in fact does a whole lot more than just mail.

If I have a folder set to headers only and I delete a mail, does it get moved to the Deleted Items folder even though I don’t have to re-download it?

Yes. The way in which it works is that the WL Mail client has seamless synchronization with the web-based version. When you delete a mail and then click the Sync button (or just wait until the client performs another mail check), what you do on a local level will be reflected exactly in the web-based version, and can be loaded the same way on either platform. Even if you did not read the mail and deleted it, it will still be moved to the appropriate location.

Is there any way I can turn off the reading pane so I don’t automatically download an email when I click on it?

Yes, you can turn off the reading pane. First it should be noted that the reading pane is by design disabled whenever viewing the Junk e-mail folder. So even if you have it enabled and go inside the Junk e-mail folder, it will turn itself off when in there. However if you want it off all the time, press ALT+V to bring up the View menu, then click Layout.

You will see this:

image

Simply uncheck the box for Show the reading pane, then click Apply then OK.

Will adjusting synchronization settings for my Windows Live account affect any other Live or other POP/IMAP accounts I have in WL Mail?

No. Whatever you adjust for sync settings will only affect that specific account. It does not "carry over" to others.

Are headers re-downloaded every time I start the WL Mail client?

Yes. WL Mail ordinarily performs a mail check (what it called a "Sync") on startup unless you configured it otherwise. Being that headers are so small in size this will not be a cause for concern.

Will choosing headers only for specific folders affect the way I search mail in WL Mail?

Yes. Any search performed in a folder you have set to headers only will only search to/from addresses and subject line, but not the body of the message since it isn’t downloaded locally at that point. To perform full searches that include the body of the message, you will have to have full synchronization or use the web-based version.

If I currently have a folder set to full synchronization and switch to headers only, are the local copies removed for the mail in that folder?

No. If you want to configure a Live account with headers only for everything, remove the account from WL Mail and re-add it. On first check of mail, stop the process (click "Sync" twice to see the window and hit the stop button), set all folders to headers only, then perform another sync.

Posted By George 0 comments

As I say in the video below, it does amaze me how many people are not aware of the simple shortcuts one can use to navigate though text quickly – and in many cases faster than you would with a mouse.

For some of you, what’s listed here will make you say to yourself, "Okay, who doesn’t know these keyboard shortcuts?" Quite a few, actually. You’d be surprised.

I label these as keyboard shortcuts everybody should know because if you rely too much on your mouse, it can prove to be a huge time waster. It can mean the difference between taking five minutes to type up something and thirty.

Using myself as an example, what I used to do to save time was memorize the keyboard shortcuts from the context menus in Windows applications. Using something like Notepad, what I used to do for copying years ago was – and I kid you not – ALT+E, C. For cut I used to do ALT+E, T. (These commands do in fact still work, even in Windows 7.) I wasn’t stuck on the mouse. I was stuck on context menus, as odd as that sounds. Fortunately I got out of that nasty habit and started copy/cut/pasting the proper way.

Here are the shortcuts mentioned in the video below. Some of these are very obvious, but bear in mind what’s obvious to you may not be to another.

HOME

Go to beginning of line.

END

Go to end of line (insert lame TRON reference here).

Left/Right Arrow

Move left or right, character by character.

SHIFT + Left/Right Arrow

Move left or right, character by character, highlighting text as you move.

CTRL + Left/Right Arrow

Move left or right, word by word.

CTRL + SHIFT + Left/Right Arrow

Move left or right, word by word, highlighting text as you move.

SHIFT + CTRL + HOME/END

Selects all text before (HOME) or after (END) the current position of the cursor.

CTRL + A

Select all text

CTRL + X

Cut text

CTRL + Z

Undo a cut

CTRL + C

Copy text

CTRL + V

Paste text


Posted By George September 14, 2009 0 comments

If you’ve ever used the Run command box in Windows, you probably know you can type certain predefined commands to open programs, etc. For example, if you type “notepad” in the Run box, it’ll open Notepad in Windows.

If you type “cmd” in the Run box, it opens the command prompt. If you type “regedit”, it open the registry editor. So on and so forth. Wouldn’t it be cool if you could create your own predefined Run commands?

For example, let’s say I wanted to open a particular program when I typed in my name, Aseem, into the Run box? Right now if you type your name, you’ll probably get an error like the following:

custom run commands

Whoops! Well, with a few simple registry hacks, we can create our own custom run commands to launch whatever program or file we like. Here’s how.

1. Open the registry editor by going to Start, Run and typing in regedit.

2. Now navigate to the following registry key:

HKEY_LOCAL_MACHINE\SOFTWARE\Microsoft\Windows\CurrentVersion\App Paths

3. Now right-click on App Paths and choose New and then Key.

create run commands

4. Now give the key any name that you want, such as your name or whatever else you like. This will be what you type in the Run box later to launch the custom program. Just make sure that it has a .EXE at the end of the name.

create run command

5. Now in the right hand side, you’ll see a Default registry key (string value). Right-click on that and choose Modify. Enter the path to the file that you want to launch.

registry file paths

6. Click OK and then right-click in the white space and choose NewString Value.

new string value

7. Name the key Path and the value should be set to the path of the containing folder of the file you just set on the last key. So in my case, it would be F:\My Documents\GotSent\.

registry paths

That’s it! Now you can go to Start, Run and type in the name you set for the new key in App Paths and your program will launch! For me, I will type “aseem” and GotSent will load up.

new run commands

Note that you are not just limited to EXE files, you can point to any file type you like: PDF, DOC, AVI, MP3, etc, etc. That means you can create your own shortcuts to documents, videos, audio files, or programs!

Good luck!

Posted By George 0 comments

One cool tip that I read today on Scott Hanselman’s blog was about Windows 7 and how you can add the computer name to the taskbar to make it easy to identify which computer are you.

When I read it, I thought how simple it was to do this, yet how I never even thought of it before! However, adding the computer name to the Windows 7 taskbar is absolutely great because if you are running multiple virtual machines, it’s hard to remember which one you’re currently on.

You normally either have to check what is installed on the computer or check the computer name manually to figure out which computer you’re working on.

Here’s how you can setup to show the computer name on your Windows 7 taskbar:

Step 1: First, go the Documents folder and create a new folder there with the same name as your computer name. You can find your computer name by right-clicking on My Computer and choosing Properties.

This is what the folder should look like in the Documents folder. Note that you can create the folder anywhere you like, I’m just using Documents for illustration purposes.

Step 2: Right-click on an empty area in the taskbar and choose Toolbars, then click on New Toolbar.

Step 3: Now you want to browse to the location of the folder you just created. Choose that folder and click the Select Folder button.

That’s it! Now your computer name will show up on the Windows 7 taskbar like below:

Thanks IT-Flux staff !

Posted By George September 13, 2009 0 comments

Get updates via email